

When you invest in a Speed Queen washing machine or dryer, you’re choosing the world’s most durable laundry brand, built to deliver decades of reliable performance. But even the toughest commercial-grade domestic machines can experience issues.
Speed Queen Washer & Dryer Repair: Common Faults, Fixes and Troubleshooting Guide
As the only official service agent and authorised parts distributor for Speed Queen appliances in Southern Africa, we at Lead Household Appliances have compiled this ultimate troubleshooting guide. Use this list to diagnose common issues, perform easy fixes, and know when to call our factory-trained experts for genuine Speed Queen repair in South Africa.
Washers
Installation Requirements
What to check BEFORE first use:
| Component / Accessory | What to do / Check | Why it matters / What could go wrong | |
| 1.1 | 2 x shipping brackets | • There is one shipping bracket under the lid around the agitator; Remove it before first use. Store for future use during transportation. • The second shipping bracket is clipped in under the base panel (in a cut-out under the box). Make sure the bottom of the box is removed and no shipping bracket remains underneath. Usually when the machine is unboxed, this shipping bracket automatically dislodges itself. It could also fall out during transit or handling of the equipment, but it is still imperative to check that it is not present, before switching the machine on to do the first wash cycle. |
Prevents major faults: • If the agitator bracket isn’t removed → water may gush out from the back panel / small hole, resulting in flooding. → It may cause damage to the fabric dispenser • If the base bracket remains and machine is activated → machine will “move violently” over the floor. |
| Note: It is not uncommon for the bottom shipping bracket to dislodge during transportation — this is not something to be concerned about. | |||
| 1.2 | 4 x rubber pads/feet (To be found in a transparent plastic bag, inside the drum of machine, with other accessories.) | These must be fitted on each foot of the bottom base plate/cabinet, at each corner. Note the rear feet of the cabinet are self-levelling and are meant to be loose in order for feet to be adjustable. | If the machine is moving or ‘walking’ over a tiled floor when spinning — ensure the rubber pads are present on the machine’s levelling feet and replace any feet that show signs of wear. |
| 1.3 | 2 × inlet hose 2 × flat washers 2 × sieves/screen filters |
Inlet Hose & Valve Installation: Use the supplied washers / screen washers. COLD WATER ONLY SETUP: 1.) Prepare the Hose: Fit the washers into the hose connectors. 2.) Connect to Machine: Screw the blue inlet hose onto the top inlet valve at the back of the cabinet. 3.) Hand-Tighten Only: Use fingers only to start the connection. Do not use pliers yet; this ensures the connector isn’t cross-threaded (screwed on skew). 4.) Connect to Tap: Attach the other end of the blue hose to the cold water tap. 5.) Seal Hot Valve: Screw the supplied brass block-off cap onto the bottom hot water inlet valve to prevent leaks. 6.) Final Tighten: Once hand-tight and correctly aligned, use gas pliers to give a final firm tighten to both the cold hose connector and the brass cap. SETUP FOR BOTH HOT (red) AND COLD (blue) HOSES: 1.) Identify Hoses: Locate the two hoses; the Blue markings indicate the Cold Water hose, and the Red markings indicate the Hot Water hose. 5.) Fit Washers: Ensure the supplied washers are fitted into all hose connectors. 5.) Correct Valve Placement: Connect the Blue (Cold) hose to the top inlet valve and Red (Hot) hose to the bottom inlet valve. 5.) Hand-Tighten First: Use fingers only to screw the connectors onto the machine. This prevents “cross-threading” (screwing on skew), which can permanently damage the valve. 5.) Final Tighten: Once the connectors are straight and hand-tight, use gas pliers to provide a final firm turn to ensure a leak-proof seal. |
Prevents leaks: Improper connection or the wrong hose connection* can damage inlet valve threads → leads to water leaks. Block off. NOTE: Damage from incorrect installation is not covered under guarantee. *Old black rubber Speed Queen hoses not to be used. |
| 1.4 | Drain/outlet: stand-pipe/drain hose | The washing machine’s drain hose should feed into a vertical standpipe (or waste pipe) of correct dimensions or into a basin: – Standpipe relative height and diameter must follow manufacturer/installation guidelines. – The hose should not be sealed tightly into standpipe (do not use silicon sealant) — no airtight (rubber grommet) connection; maintain air-gap / to prevent siphoning. – Ensure the drain hose is correctly positioned with no part of the “ribbed” section inside the standpipe when draining. – Don’t extend the washer drain hose with another pipe. |
Prevents water siphoning or draining issues. If standpipe is incorrectly installed (wrong height, improper hose insertion), machine may continuously drain (water never stays), or siphon unexpectedly, leading to incomplete wash cycles. |
| 1.5 | Block-off brass cap | This is used to block off the HOT water inlet valve when the machine is only connected to a cold water. | |
| 1.6 | Fabric Softener Dispenser | Fabric softener colour choice: Opt for white or light colour fabric softener Darker dyes (eg. Purple) can occasionally leave residues on light cottons that resemble oil stains) The Dilution Rule: Always pre-dilute concentrated softener before adding to the dispenser. Option A: Mix a 500ml refill tube with 5.5L of water (yields 3 x 2L bottles). Option B: Mix 2L of softener with 4L of water (yields 3 x 2L bottles). |
The washing machine does not automatically add water to the softener. To ensure a consistent flow and prevent ‘slugs’ of thick liquid, the consistency must be the same for every load. Pre-diluting significantly reduces waxy build-up inside the agitator. Without this, the softener can become sticky and mouldy, eventually clogging the agitator’s internal distribution holes. |
| 1.7 | Identifying brown stains on garments | 1) Do the marks resemble coffee or tea stains? 2) Are the stains resistant to multiple re-washes? 3) Are the marks appearing only on light cottons or silk?. If yes to the above, the cause is likely fabric softener “scrud” (build-up). |
Regular care: Remove the top cover of the dispenser regularly to check for residue. Clean the unit thoroughly with warm water to prevent sticky build-up and ensure your whites stay bright. A clean dispenser is essential for a high-quality wash. Regular maintenance prevents the mold growth that leads to permanent staining on light-colored garments. |
Service email: service@lead.co.za
| Important Installation Requirements: | ||
| Flooring: The washing machine must be installed on a solid, level concrete floor (tiled or bare). | ||
| Stability: Do not place the machine on a rubber mat, wheeled trolley, pallet, or wooden frame. These surfaces are not stable; they cause excessive vibration to be absorbed by the weldment (internal frame), which can lead to structural damage over time. | ||
| Power Supply: An extension cord or multi-plug may be used with the washing machine. |
| Troubleshooting Water Leaks | ||
| 2.1 Check the inlet valves at the back of the machine where the other end of the inlet hoses are connected to have been tightened properly. Wrap tissue around both inlet valves with part of the inlet hose to identify if water is leaking from this point. | ||
| 2.2 Check if the tap itself is not leaking. If so, it needs to be fixed by a plumber. | ||
| 2.3 Check that the vertical PVC waste pipe is not overfilling with water/ foam. | ||
| 2.4 Check if he leak is not linked to other appliances, connected next to washing machine, sharing the same services. | ||
Service email: service@lead.co.za
Drain and Plumbing
Why correct standpipe setup matters
The washing machine’s drain hose must be correctly installed in a vertical standpipe to ensure proper drainage and prevent siphoning. Siphoning is the effect where the washing machine will fill with water and drain at the same time.
| Customers moving from front loaders to top loaders often have a lower standpipe. This needs to be raised to the recommended height. Follow these guidelines: | ||
| 3.1 Standpipe height: The recommended height is at least 914 mm or higher. Basin may also be used. | ||
| 3.2 Maximum height: The machine will not drain if the standpipe is higher than 2438 mm (8 feet). | ||
| 3.3 Drain hose placement: Place the drain hose securely into the PVC standpipe. To prevent siphoning, do not insert any ribbed portion of the drain hose into the standpipe. | ||
| 3.4 Do not extend the drain hose of the washing machine to reach to waste pipe as this causes strain on the spin belt and the washing machine’s motor. | ||
| 3.5 Additional checks: Ensure the vertical waste pipe is not overfilling with water or foam. If it does, it is an indication that the PVC waste system can’t handle the amount of water drained by the washer (500ml/sec) and should be checked by a plumber. | ||
| TIP: Correct standpipe setup prevents water from continuously draining away during the fill cycle and avoids siphoning from taking place that can interfere with wash cycle. |
Speed Queen Washing Machine Faults & Troubleshooting
Common issues and their effective solutions:
| Issue / Fault | Likely Cause / What to Check | Recommended Action / Tip | |
| 4.01 | Washer won’t start to fill with water | • Power supply / wall plug / circuit breaker issues. • Cold-water inlet hose connected incorrectly or to wrong valve (Must be top valve). • Tap closed or faulty. • Temperature selector knob set to hot. Correct position is cold/cold. |
1. Confirm plug and socket work (test other appliance). 2. Set temperature selector to cold/cold if using cold water. 3. Check hose connection to cold inlet (top valve). 4. Ensure tap is OPEN and working. Test water flow. If issue persists, suspect inlet valve blockage or water pressure issue. Check the inlet hose connected to the tap point and to the inlet valve at the back of the machine as there may be sand or debris blocking the water flow. Clean the end connected to the tap (with sieve) and remove the washer/filter at the inlet valve to clean. |
| 4.02 | Washing machine stopped in the middle of a cycle | • Motor overload (overloaded laundry) — the thermal overload switch might have tripped to prevent the motor from burning out, which can happen if there is too little water or if the load is too large, restricting the movement of the clothes. | If overloaded: switch off washing machine, allow ~2 hrs for motor to cool down, then retry. If after reset nothing happens — may need qualified service. |
| 4.03 | Washer fills with water but fails to start the agitation cycle. | • A worn or broken drive belt, will prevent the motor from turning the agitator. • A faulty timer or motor may also possibly be the cause. • Something stuck (e.g. in pump). Gearbox seized up. |
Initial Checks Ensure the lid is completely closed. Remove load and redistribute evenly; confirm inlet hose is connected to correct valve. If still no spin — professional inspection recommended (pump or internal mechanism fault). Stop machine. Call for service. Diagnostic Test (The “Humming” Test) To identify if the issue is mechanical or electrical, perform the following: 1) Push the cycle selector knob in to stop the machine. 2) Rotate the knob to a Regular Wash cycle. 3) Pull the knob out to start. 4) Listen closely: — If you hear a humming noise: This usually indicates a mechanical blockage or that the gearbox has seized — If there is total silence: This points to a potential electrical fault, such as a timer or motor issue. Call for service |
| 4.04 | Water leak upon installation | Refer to Table 1.1 above and Table 2.1 – 2.5 above. | |
| 4.05 | Poor draining or water remaining | Blockage in the drain hose or pump. Look for kinks. No extensions on drain hose. | If the hose is clear, the drain pump may be faulty. / Blockage in pump or drain hose. Call for service. |
| 4.06 | Water leaking under the machine | Loose hose connections or a faulty water pump. Leaking drum seal. | If the leak is not from an external hose connection, a technician is needed to inspect internal components. Stop machine. Call for service. |
| 4.07 | Excessive shaking or loud noise during spin | • Make sure the machine is level and the load is evenly distributed. • Rubber feet missing, worn, or floor surface unstable (wooden floor/wendy-house/ boards/ frame/ pallet/ wheels). (Refer Table 1.2 above) |
If levelling and load distribution don’t fix it, place washer on a solid floor. If on first cycle after installation, make sure shipping brackets under the base have been removed and that any missing feet have been replaced. (Refer Table 1.1 above) |
| 4.08 | Wash cycle takes too long | Low water pressure, blocked inlet screens/filters. | If water pressure is normal, faulty valve could be the cause. Stop washer. Call for service. |
| 4.09 | Unpleasant odour (Smelly Washer) | Mildew, detergent residue. | Run a hot cycle (if available) with liquid detergents. Wash for a number of loads (3 – 7) on extra large water level. |
| 4.10 | Metal-on-metal noise, loud noise — especially during wash or spin | Possibly a foreign object (wire, clip, pin, hair-clip, etc.) stuck between inner and outer drum or in pump. | Before anything else — stop machine, open drum and inspect for any foreign object. Feel around inside drum, especially through holes, for wires or items stuck. Remove anything found. If noise persists, likely an issue with pump or bearing — Call for service. |
| 4.11 | Clothes still wet after spin cycle | Fault with drain pump or drainage system. If a small load (e.g. towels) still remains dripping, not enough tension on the spin belts. | For small-medium load, test with 4 towels. If after correct spin they’re still dripping, suspect a drainage/pump fault — Stop machine. Call for service. |
| 4.12 | Agitator fins damage | Overloading or washing heavy items (like rubber mats, sneakers) with insufficient water, restricting movement and causing undue stress on agitator fins. | Always set water level sufficiently to cover garments; avoid washing heavy, restrictive items without enough water; ensure load has room to move freely. Damage from such misuse is usually not covered by warranty. Apply The Golden Rule: Set the washer up with your load. Allow the washer to wash for 1 minute. Pick up the lid and SEE that ALL the clothes are well covered with water. If not, increase the water level using ‘reset’ load size knob on level 5. Remove some clothes as washer is overloaded. |
Service email: service@lead.co.za
What does the error code on my Speed Queen washer mean?
A digital Speed Queen washer error code indicates a specific fault. While basic codes (like an unbalanced load) can often be cleared by following the manual, others require expertise. Check your user manual first.
For complex codes, contact us. We can provide specific manuals and offer authorised Speed Queen technical support.
Helpful Tips for Long-Lasting Speed Queen Washer Performance
Keep your washing machine running smoothly for decades by following these simple maintenance steps:
For optimal washer performance, we recommend that you apply Koos’ Golden Rule:

- Use enough water. Apply Koos’ Golden Rule. (See above.)
-
Don’t overload – follow the recommended capacity for optimal performance and less wear. Apply’ Koos’ Golden Rule. (See above.)
-
Rather use a liquid detergent. (Use 1/2 cap of liquid bottle)
-
Ensure that the installation of the washing machine is properly done.
-
Set money aside for maintenance when necessary.
-
Don’t use bleach in the washing machine. Rather soak in a bucket and remove the washing to be washed.
-
Don’t use the washing machine as a soaking tub.
Genuine Speed Queen Parts and Service
Lead Household Appliances is the only authorised importer and distributor of genuine Speed Queen parts and accessories in Southern Africa. Genuine OEM parts from Speed Queen are precision engineered and tested for performance so your machines will be running better for a lot longer.
Tumble Driers
Installation Requirements
What to check BEFORE first use:
| Speed Queen dryer should be connected to the following, especially where the dryer is being used in a B&B, lodge, etc. | ||
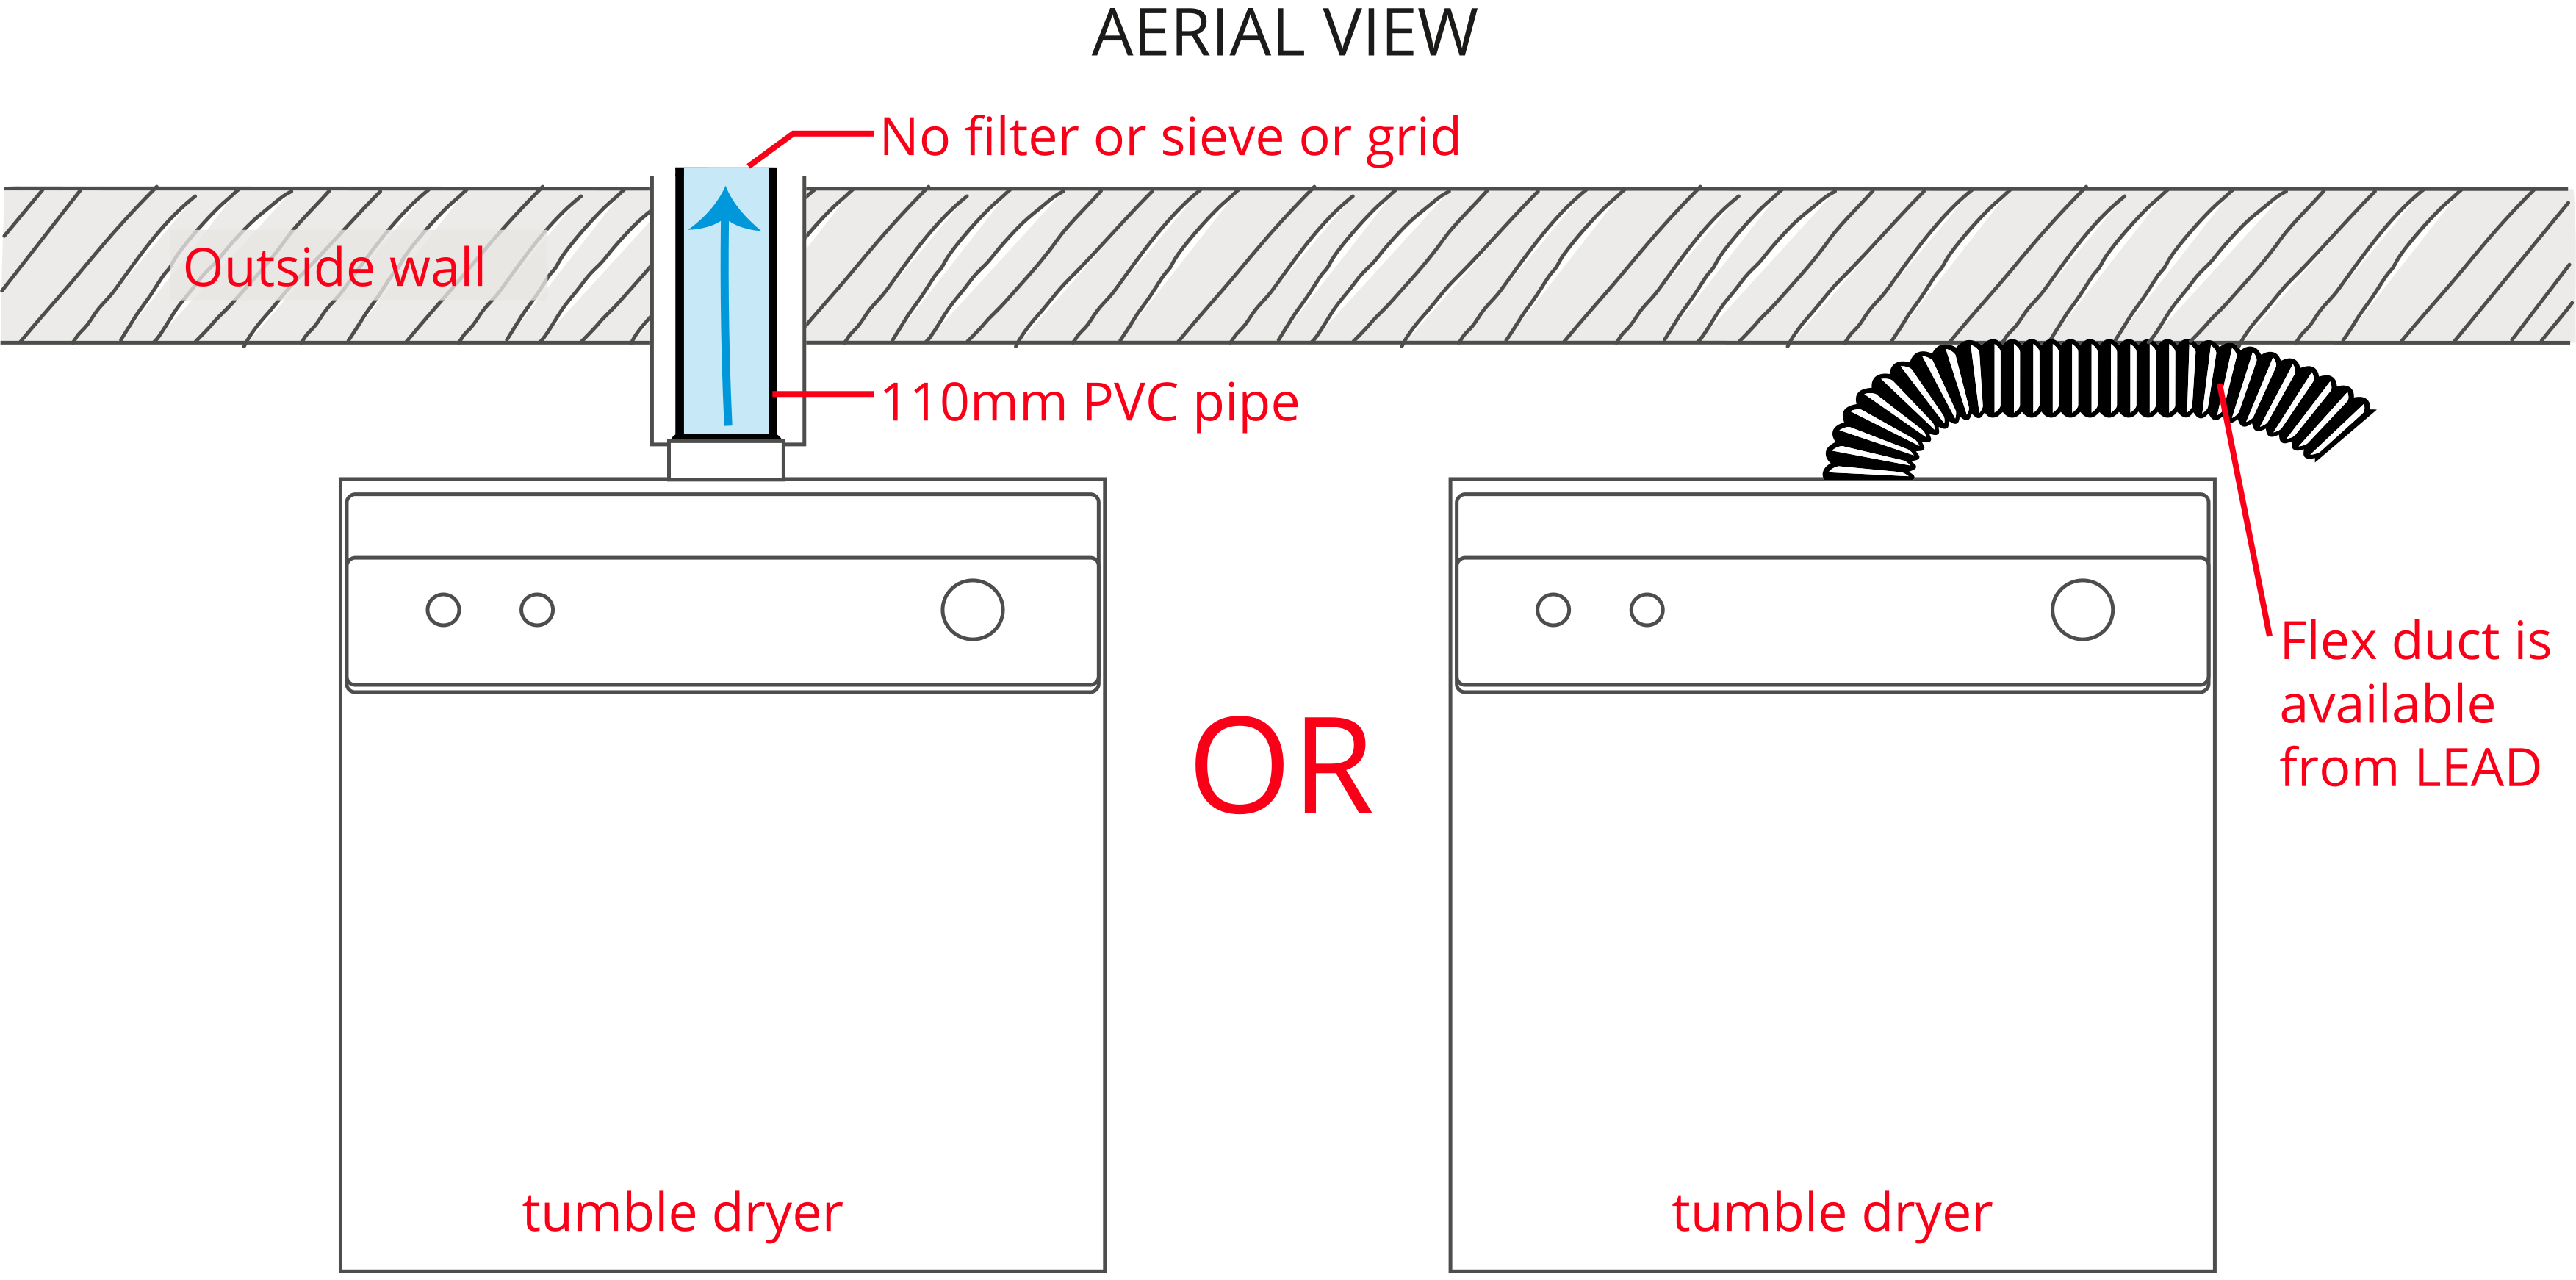
| Open the door and take note of the installation requirements as per manufacturer instruction and warning. 5.1 DRYER MUST BE EXHAUSTED TO THE OUTDOORS. |
||
|
|
||
| 5.2 Dryer requires a double pole 60Amp 4 x 4 Isolator 5.3 Dryer requires a 4mm supply cabling between the board and the isolator. Use SABS approved cabling as other cabling tends to burn. (2,5mm cable is rated 25Amp.) 5.4 Dryer requires its own 32-amp circuit breaker (CCT) on the board. This requirement is especially applicable where the dryer is used a lot. Eg. In a commercial environment (Lodge / laundry setting) NO EXTENSION CORD OR MULTI-PLUG MAY BE USED WITH A DRYER AS IT USES A 330W ELEMENT AS IT WILL BURN OUT! |
||
| Correct installation will prevent: – Wall plug from burning out with the dryer plug melted into it. – Power tripping – 20Amp CCT breaker on the board when the dryer and dish washer are running at the same time. – Dryer stopping mid-cycle because the wall plug is getting hot. |
||
Service email: service@lead.co.za
Speed Queen Tumble Dryer Faults & Troubleshooting
Dryer issues are often related to airflow and heating. Here’s how to troubleshoot your Speed Queen dryer:
| Issue/Fault | Common Cause & Easy Fix | When to Call a Pro | |
| 6.1 | Dryer won’t start | Is the door properly closed? Is power reaching the unit? Check power. | If the door is secure and power is present, the start switch/motor or control panel/timer might be faulty. Call for service. |
| 6.2 | Dryer runs but no heat | The most common cause is a faulty thermal fuse. | Immediately. These parts require professional testing and replacement with genuine Speed Queen parts. Call for service. |
| 6.3 | Dryer takes too long to dry | Ensure the ducting pipe is open. | Thermostat on element is erratic. Call for service. |
| 6.4 | Loud or strange noises (Squeaking/Rattling) | Check for loose items like coins or buttons in the drum. | Persistent rattling or squeaking often means worn drum rollers, belt, or a worn idler pulley. Stop machine. Call for service. |
| 6.5 | Dryer shuts off mid-cycle | Motor faulty or wall plug burnt out. | Call for service. |
| 6.6 | Clothes are wrinkled / creased or damp | Washing machine is rinsing with hot water. | Ensure the washer is connected to the cold water inlet valve to rinse with cold water. |
Service email: service@lead.co.za
Speed Queen Tumble Dryers : Comprehensive Fault Finding
(Quick Reference Table)
Here is a consolidated list of diagnostic tips our technicians use for both washers and dryers:
| Fault Area | Possible Issue | Action to take | |
| 7.1 | Power Supply | No power to the unit. | Check wall plug and circuit breaker. |
| 7.2 | Control/Operations | Machine not responding. (Tumble Drier) | Check if the door is fully closed. |
| 7.3 | Motor | Motor humming or drum not turning. | Stop use immediately. May indicate a motor fault, seized bearing. Call for service. |
| 7.4 | Motor running; Cylinder not turning | Belt burnt off due to overloading of dryer. | Call for service. |
| 7.5 | Heating (Dryer Only) | No heat / not drying the clothes: Thermostat on element erratic / Ducting is blocked. | Check thermal fuse and heating element continuity – Call for service / Ensure all vents are clear. |
| 7.6 | Water System (Washer Only) | Not filling – Tap is closed. Open or sieve as it is blocked. Over-filling – Inlet valve faulty / Pressure bulb blocked. Not draining – Pump blocked. Hose-to-pump blocked. |
Check water inlet hoses for blockage/pressure. Inspect the drain hose for kinks/lint. Call for service. |
| 7.7 | Noise | Excessive grinding, rattling, or thumping. Noise out of the normal. | Level the machine, check for foreign objects. May indicate worn drum rollers. Call for service. |
Service email: service@lead.co.za
Do you need a certified Speed Queen repairs technician?
As the authorised agent and parts distributor for Speed Queen appliances in Southern Africa, we strongly recommend using genuine parts and authorised technicians for any repairs — to maintain performance, warranty, and reliability.
State of the art technology links our call centres nationally • Trained service controllers utilise uniquely developed software to log, manage and record the repairs history of your equipment • Comprehensive spares stockholdings are held in all major centres so that you do not have to wait for spares to be imported or couriered from one branch to another • Factory trained technicians employed by Lead and working ONLY on Lead brands • Direct technical support from Lead technicians in Johannesburg, Durban, Cape Town, Bloemfontein, Nelspruit, Port Elizabeth, East London, George, Windhoek and throughout Southern Africa.
Helpful Tips for Tumble Dryer Longevity
Follow these simple steps:
Essential Maintenance
- Clear the Lint Filter after every load. This is the simplest way to ensure proper airflow and prevent overheating.
-
External Venting: A ducting pipe (110mm PVC or Flexible Aluminium) must be fitted to the exhaust to vent the dryer outdoors.
– This prevents lint and ‘fluff” from accumulating in the dryer cabinet which damages the roller and tensioner shafts and motor.
– Proper venting increases drying efficiency, significantly reducing both drying time and electricity costs.
– By using the TIME DRY CYCLE 70 → 0, the operator estimates how much time is needed for the load, thus reducing cost. If more time is needed, can extend the time again.
– Use the ‘No Heat’ setting to tumble dry clothes to remove lint, fluff, hair, tissue etc. from dark/black colours + synthetic items like school jerseys, ski pants, gym clothes.
Smart Operation for Cost Savings
-
Master the ‘Time Dry’ Cycle:
– Use the 70 → 0 Time Dry setting. The operator estimates how much time is needed for the load, thus reducing cost. If more time is needed, can extend the time again. -
The ‘No Heat’ Hack:
– Use the ‘No Heat’ setting to tumble dry dark or synthetic items (like school jerseys, gym wear or black trousers). This effectively removes lint, fluff, hair, tissue fragments, etc. without heat damage or static.
Power Supply and Installation
-
Professional Setup:
– Ensure your dryer is installed according to the correct installation requirements (see below). While there may be an upfront installation cost, a correct setup prevents expensive mechanical failures and ensures your machine runs efficiently for years.
If your troubleshooting doesn’t resolve the issue, we can help!
As the exclusive importer and authorised service partner for Speed Queen domestic appliances in Southern Africa, we provide:
-
Genuine parts that maintain your warranty.
-
Factory-trained technicians approved by Speed Queen.
-
Trusted after-sales support and expert advice.
Don’t compromise your machine with non-genuine parts. Contact us today for official service and support.


